sabato 26 maggio 2012

DIY Pop-Top Necklace


Project Runway fans may have noticed Viktor Luna rocking this look.  We certainly did. And in case we missed it, many of you wrote us to make sure we saw his necklace. We actually hold the patent for this design.  We’re sharing the tutorial here so you too can create an edgy, DIY pop top necklace. 
This can be made with the most basic of supplies – a nail clipper and emery board will work as your tools, or you can step it up a notch and use jewelry pliers and a cutter. Sure, you need the pop tops too – but start spreading the word among your soda and beer-guzzling friends and you’ll gather them in no time. Here’s how you do it:
How to Make a Pop Top Necklace

Materials:

• Pop tops (about 100), cleaned
• Two jump rings
• Lobster clasp
• Jewelry pliers
• Jewelry cutters (or nail clippers)
• Emery board

How to Make a Pull Tab Necklace

Directions:

These directions are for a necklace made with stacks of 4 pop tops for each “link.” A short women’s necklace used 27 links of four pops, for a total of 108 tops. You can modify and to make links of 2 or 3 pop tops if you want to use fewer pop tops. Regardless of the length you make, you need to make a cut through the wider opening on half of your pop tops. Do this by using a nail clipper or cutter to make a snip to the side of the wider opening.

  1. Start by holding a stack of four uncut pop tops in one hand. 
  2. With your other hand, press the snipped edge of a cut top against the stack, so it snaps into place.
  3. Continue until four cut pop tops have been linked to the stack of uncut pop tops. This is how you build the entire necklace, adding cut tops to uncut tops, in links of four. Continue until you have as long a necklace as you desire.
  4. If needed, you can “sand” any rough edge with an emery board. 
  5. When the necklace is the desired length, add a jump ring to one end of the necklace.
  6. Add a jump ring and a lobster clasp to the other end.
How to make a necklace from Pull TabsPop Top Necklace DIY TutorialPop Top Necklace

How to Crochet with Pop-Tops


Step 1: Materials & Tools

 
  • 6 pull-tabs
  • Crochet thread (1 or 2 colors). We recommend a strong synthetic fiber that is resistant to abrasion
  • Lighter
  • Scissors
  • Wire cutters
  • No 3 crochet needle


Step 2: Prepare Your Pull-Tabs


Choose tabs that are in good condition. Wash them until they are clean and shiny. Use the wire cutters to remove any sharp edges.


Step 3: Start Crocheting


Begin crocheting the center of the flower using a single stitch to cover the 'thin side' of the tab (top figure) (the side that's pulled when a can is opened). Repeat this step, joining all 6 pull-tabs in a line. (bottom figure).


Step 4: Connect the Circle


Pull the line of tabs into a circle and crochet them together (top figure). Fill in the middle space with single stitches until it forms the center of the flower (bottom figure). Cut the thread leaving a small tail. Burn the thread's end with the lighter to prevent the thread from fraying.


Step 5: Add Color to the 'Petals'


Cover the outer ring of the pull-tab using a double stitch with different colored thread. There are 22 double stitches per tab.


Step 6: Cover and Connect


Cover all tabs in this same manner, connecting each of the petals together.


Step 7: Finish the Flower


When the last tab is covered, join it to the first one with a single stitch. Finish it off by burning the end of the thread to prevent fraying. You're done!


Some ideas for your finished flower:

  • Sew or hot glue a pin on the back to create a brooch
  • Attach a loop of thread to create a snowflake holiday ornament
  • Crochet many flowers together to form a wall hanging or a scarf.

Crafty Et ceteras: Craft/DIY Blogs

Crafty Et ceteras: Craft/DIY Blogs I ♥

Crafty Et ceteras: Black and White Photo on Canvas Tutorial

Here is what you'll need:
**Your choice of photos (I made a custom collage (10 x 10) using Picnik and then sent the files to a flash drive and had Staples print each collage photo file on 11 x 17 card stock paper.)
**Canvas (I used a 12 x 12 size. I bought a package of 7 on sale for $12 at Michael's.)
**Mod Podge (or your homemade version of Mod Podge)
**Foam Applicators
**Acrylic Paint in your choice of color (I used Martha Stewart Crafts Multi-Surface Satin Acrylic Craft Paint in Beetle Black.)
**Scissors or Paper Trimmer


Step 1: Using a foam applicator, apply a coat of acrylic paint around the border (about 2-3" in) and on all sides and let dry. You want to apply a thick enough border around the edges so that the picture you center on your canvas covers any white space.


Step 2: Cut/trim your photo down to the size you want it to be.


Step 3: Add a thin coat of Mod Podge using an applicator brush. Make sure you add enough so that when you lay your photo down, there is enough glue at the edges. It's okay if you put a wider layer of Mod Podge than your picture.


Step 4: Gently place your photo in the center of your canvas. Starting at the center, gently press your hand down in the center and push out towards the edge slowly easing the photo down onto the glue and easing the air bubbles out. Continue this process all around the photo. The edges may want to sort of curl up, just continue running your finger around the outside edges (drawing a square as you go) to allow the glue to get tacky enough to hold the edges down. (I had to keep "drawing" the square with my finger several times until I felt the picture was properly adhered to the canvas.)


Step 5: Allow to completely dry.

Step 6: Add your first coat of Mod Podge using an applicator brush to your newly placed photo on the canvas. Make sure to cover the entire canvas.


Step 7: Allow your first coat to completely dry.

Step 8: Add a second coat of Mod Podge, making sure to cover the entire canvas.

Step 8: Allow your second coat to completely dry.

Step 9: OPTIONAL: If you feel you need to add a third coat of Mod Podge, go ahead and add it. Make sure to allow to completely dry.

Once your canvas has finished drying, prep it for hanging or displaying. You could add a ribbon hanger to your canvas or just add picture hanging hardware. Or you could display your art on a plate holder easel. Lots of possibilities!


Notes:
When I had my pictures printed at Staples, they first started printing them on the card stock. However, due to technical difficulties with their Commercial printer (it kept eating the paper), they changed my paper to a photo-type paper. When I placed the photo-type paper on the mod podge, the moisture from the glue caused the paper to begin to curl up. It didn't want to lay right and also began to ripple/wave. The cardstock paper by far was the most superior paper. It stayed down like I was hoping it would and had almost no ripple/wave to it. So, I highly recommend the cardstock paper for this particular project.

I made a collage of 10 canvas photos for my in-laws for Christmas. Hopefully I can get them hung on their wall for them soon and I will update this post to showcase their new handmade art. :)

UPDATE:

Here is the collage of 10 canvas photos now hanging on the wall. :)

venerdì 25 maggio 2012

DIY Ombre Sugar Hearts


We have some super sweet treats for all you Do It Yourself fans made with love by  Erica O’Brien Cake Design and Brooke Allison Photography. These ultra stylish DIY Ombre Sugar Hearts could easily be used at a fabulous bridal shower, for wedding favors, as a special surprise for your sweetie on Valentine’s Day or even decor for the cutest wedding cake in the world.
What you’ll needTwo cups sugar (or more, depending on the number of colors you want), divided
4 teaspoons (or more) egg white or liquid meringue (1 teaspoon of meringue powder mixed with 1 tablespoon warm water)
Paste food coloring (found at local craft store)
Large cutting board, baking sheet or other flat surface, lined with Silpat or parchment paper
and
Baking sheet lined with Silpat or parchment paper
Ateco aspic cutters or small cookie cutters
Additional:Small and medium bowls | spatulas | rolling pin | measuring spoons | measuring cups | ziplock bags | butter | knife
Optional:3 x 4-inch treat bags | colored ribbon | cake to decorate
Step 1.Place ½ cup sugar in medium bowl. Add a small amount of paste food coloring (we used a combination of Wilton’s Rose and Violet), and mix thoroughly. This will be your darkest color. (Hint: A little goes a long way and will darken once liquid is added in next step.) Add more if needed until desired color is achieved. Add 1 teaspoon egg white or meringue liquid and mix thoroughly until the mixture resembles wet sand. Be careful not to add too much liquid or you will dissolve the sugar.
Step 2.Empty contents onto Silpat or parchment lined cutting board or baking sheet. Spread with hand or spatula and pat down, then roll over mixture with rolling pin to compress. Ideally, the flattened mixture should be as compact as possible and level, about ¼”. Press heart cutter into mixture and lift up. Place hearts on lined baking sheet. If cutter will not release heart, gently tap with the back of a butter knife. Repeat 10-20 times or as many as desired. If hearts will not hold their shape, add more egg white or meringue liquid in small increments and mix thoroughly. If sugar builds up in cutter, rinse with warm water and pat dry before continuing. Pour remaining colored sugar back into bowl and proceed to Step 3.
Step 3.Add ½ cup sugar to colored sugar  from Step 2 to lighten. Mix thoroughly. Add 1 teaspoon egg white or liquid meringue. If desired color is not achieved, continue adding additional ½ cup sugar plus 1 teaspoon egg white or liquid meringue and mixing thoroughly until desired color is achieved. Repeat Step 2. Continue with Steps 2 and 3 until desired shades and number of sugar hearts are achieved. We recommend at least three to five shades. Leftover sugar can be stored in ziplock bags for future use.
Step 4.Heat oven to 200 degrees. Heat hearts in oven for 10 minutes. Allow to harden overnight. Sugar hearts will be the consistency of sugar cubes.
Design Options:Place 10-20 sugar hearts in treat bag. Staple ribbon to bags. Tie ribbon. Can be given as gifts or used as favors.
For cake: Attach sugar heats to cake using royal icing. Begin with darkest color on smallest tier. Continue with lighter colors.
These sweet and tasty Do It Yourself Ombré Sugar Hearts were shared with us by Erica O’Brien Cake Design and Brooke Allison Photography. We have a little  Ombré Wedding Tote in our WC Shop that would be fabulous with the sweets. Click here for more DIY Edible ideas.

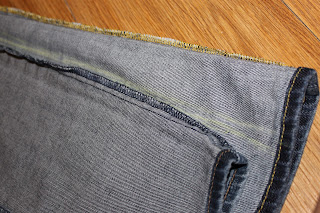
How to Make Jeans Into Skinny Jeans


First start with a pair of jeans that fit you well but are baggy around the ankle. You will also need a pair of skinny jeans that you like. 


Turn both pairs inside out.


Lay the skinny jeans on top of the baggy jeans. 


Draw a line with chalk using the skinny jeans that fit you well as a guide. The chalk line will run into the seam of the baggy pants near the knee or thigh area. *Note, on my jeans, the new seam is the outer seam of the pant leg. 


Place pins between both layers of the baggy jeans so the fabric stays in place while sewing. 


Sew with a straight stitch over the chalk line, removing the pins along the way. 


Try your new jeans on to see how they fit! Before cutting make sure you like them, stitches can always be undone ;) *Note, some jeans have more stretch than others so this is an important step. 

Now you can cut the excess!


Now they are skinny jeans!


Much better. 

Easy Infinity Scarf TUTORIAL

Easy Infinity Scarf TUTORIAL

circle scarf
aren’t stripes so fun? yep, that’s dorky me trying to take a pic of myself. which for the record, is harder than you’d think.
i ordered this top for only a few dollars in an extra large size. i thought i could shrink it to magically make it fit…. buuuuuut that didn’t work out so well. as much as i like to sew, i didn’t feel like messing with taking it in in case i messed it up. so i decided the shirt’s fate was to be turned into infinity scarfs.
To Make an Infinity Scarf: all you need is a large t-shirt, scissors, and a sewing machine. {i know there are several ways to make these, but with the stripes going side to side, my scarf needed 1 short seam. if you cut it the opposite way, no seam would be needed!}

lay the t-shirt flat and cut a 6 inch strip from the hem to the shoulder of the shirt.
with right sides together, sew the 2 hemmed edges together and trim the excess fabric. and you’re done!
for a twist, add some chunky buttons over the seam. that would be totally killer!
and there you have a super easy infinity scarf! perfect for fall, winter, AND spring! {and summer too for those who are huge scarf fans} and the beauty of this project is you can use old shirts AND get several scarfs from each shirt. economical crafting at its best!
Gift Idea: make these easy scarfs for your friends for Christmas!