mercoledì 4 luglio 2012
A Day in the Life of a Mom and a Wife: The "Burning Mask"
A Day in the Life of a Mom and a Wife: The "Burning Mask": You've all seen this pin on Pinterest , right? It's from the blog My Yellow Sandbox . It caught my attention right around the time...
mercoledì 27 giugno 2012
My Yellow Sandbox: French Braided Top Knot
My Yellow Sandbox: French Braided Top Knot: I love doing this hairstyle when my hair is a mess. I have had it curled for a few days and it's getting pretty dirty. I am cleaning...
sabato 26 maggio 2012
Some good sites and blogs :)
http://thebeautydepartment.com
http://www.coldhandswarmheartcrafts.com/2012/02/braided-belt-messenger-bag-tutorial.html
http://hellogiggles.com/diy-t-shirt-scarf
http://www.rufflesandstuff.com/2011/10/kite-bow-organizer-tutorial.html
http://www.apartmenttherapy.com/how-to-make-your-own-vertical-jewelry-box-169352?utm_source=feedburner&utm_medium=feed&utm_campaign=Feed%3A+apartmenttherapy%2Fhomekeeping+%28AT+Channel%3A+Homekeeping%29&utm_content=Google+Reader
http://cuteoutfits.tumblr.com/page/237
http://octaviarp.tumblr.com/
http://www.goinghometoroost.com/category/diy-craft-projects/
http://www.refinery29.com/bun-hairstyles/slideshow?page=5#slide-5
http://www.asuyeta.com/blogs/news/3906322-fun-friday-bandanas/
http://frostymint.blogspot.it/2010_10_01_archive.html
http://www.purlbee.com/big-herringbone-cowl/
http://www.gleefulthings.com/blog/?p=640
http://www.bloglovin.com/en/blog/2441635/love-blair
http://blogilates.com/category/fashion-2/designing
http://www.hairromance.com/
http://www.trinketsinbloom.com
http://style-files.com/archives/
http://www.afashionablestitch.com/2012/tips-and-tricks/the-button-up-refashion-swap/
http://www.iknowhair.com/popular-hairstyles-from-pinterest-20-feb-2012/
HAIR COLOR HOW TO: Hair Chalking

I'm gonna show you how to do HAIR CHALKING.
This is not new, it's been around for a while, but I thought I'd do a "hair chalking" tutorial for you guys to inspire you and have fun with!
So watch the tutorial below!


WHAT YOU NEED:
1. Soft Pastel Chalks -I got mine at Michael's craft for under $5.
***DO NOT use Oil Pastels- they will stain your hair and everything else!
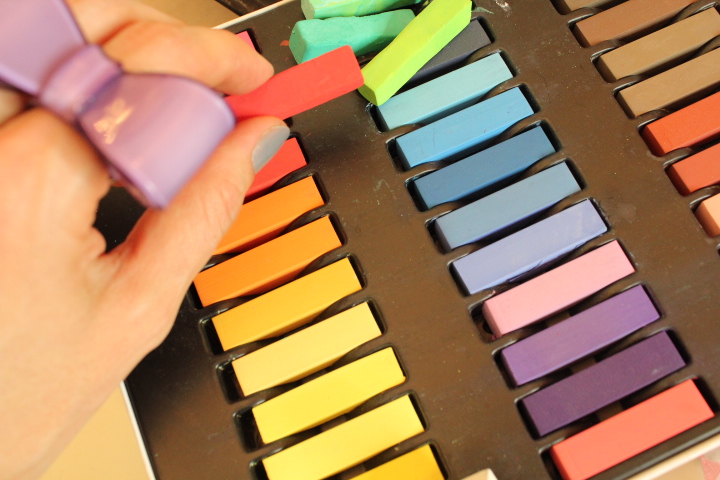
3. Protective Gloves- either latex gloves, latex free ((ofcourse) gloves, or even dish washing rubber gloves)
4. flat iron or curling iron to seal in the color
TIPS:
*The chalk might come off on your shirt- you can try misting the hair with hair spray to seal it in even more.
*Do not brush your hair too much after you chalk, it will come off on your brush and get everywhere.
*Do NOT put any wax, styling creams or anything on the "chalked hair" as it will make a huge, greasy mess!
*If any chalk comes off on your flat iron or curling iron, it wipes off easily.
*If you have blonde hair, you can skip the step of getting your hair wet- if you do, it may make the color last longer than you'd like!
*Have fun trying all kinds of colors, 2 or 3 starting with the light then going over it with darker colors.
*Blues, greens, reds and pink really show up on dark hair.
*If your hair is light, all colors will show up great!
*The chalking can be pretty drying to your hair, so make sure you condition your hair really well after you wash this out!
*This looks really cool when you braid hair, the different colored strands will look beautiful braided!

And if you sleep in it- wait til you see how pretty your pillowcase looks in the morning! (but it washes out, don't worry)
TUTORIAL: Ruched Leggings (for girls and women)
 Despite what many people think, sewing with knits is fun and easy to do!
Knit fabrics are created the same way that knitters do their magic, with needles and yarn (which is why knits have stretch to them, compared to woven fabrics). However, these needles and thread are very small and are attached to industrial machinery. So in a way, we knitters and sewers should get out of the ring and do a cheers together over some Diet Cokes because we’re really talking about the same thing here! Sort of.
 The biggest hang-up I hear from people about sewing with knits (other than they’re frightened to try. Don’t be!) is that it’s hard to find a good selection of fabrics in the average shop. It’s true. Some online shops like harts and fabric.com carry some options (I purchase most of mine at Michael Levine, FIDM, and Joanns from time to time).
 The biggest hang-up I hear from people about sewing with knits (other than they’re frightened to try. Don’t be!) is that it’s hard to find a good selection of fabrics in the average shop. It’s true. Some online shops like harts and fabric.com carry some options (I purchase most of mine at Michael Levine, FIDM, and Joanns from time to time).
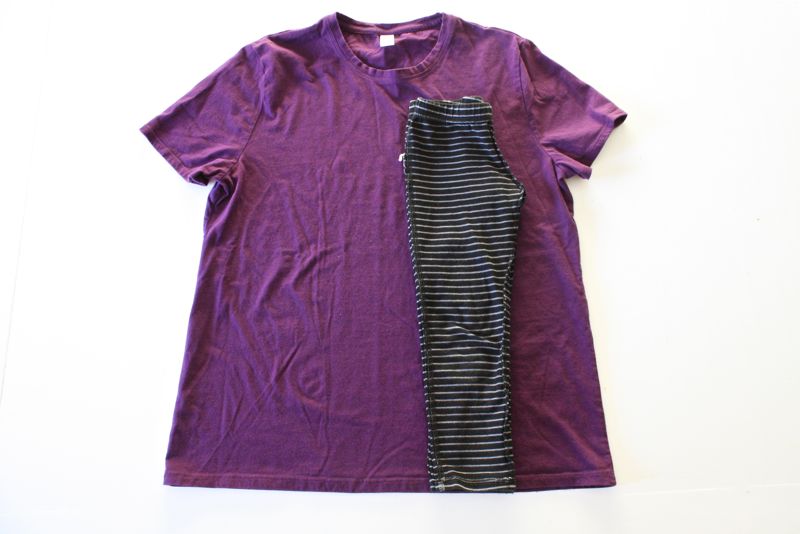
But if you’re the kind of person who wants to feel the fabric before purchasing, finding the right knit is not as easy as finding the right cotton. Thus, when making kid’s clothes, my go-to knit is: a man’s T-shirt. It’s so easy to sift through Dad’s drawer or pick up a $2 Tee at the local thrift store and turn it into something fun.
 The key to selecting a shirt is in how the fabric feels. The average cheap T-shirt does not stretch very much and becomes coarse with time and washing. You want something soft and sometimes with a bit of spandex. When I rummage the thrift shop, I simply run my hands over each shirt without even taking time to look at them. When I get to a shirt that feels soft, good quality, and has a bit of stretch, I pull it out and see if it’s a color or print I even like. If it is, then splendid! My $2 search is over.
 The key to selecting a shirt is in how the fabric feels. The average cheap T-shirt does not stretch very much and becomes coarse with time and washing. You want something soft and sometimes with a bit of spandex. When I rummage the thrift shop, I simply run my hands over each shirt without even taking time to look at them. When I get to a shirt that feels soft, good quality, and has a bit of stretch, I pull it out and see if it’s a color or print I even like. If it is, then splendid! My $2 search is over.
Ideally what you want is a soft cotton jersey knit. If it has a bit of spandex or lycra in it, even better. Make sure you wash/dry it when you get home and you’re ready to go!
Now let’s sew…
—————————————————————
Now let’s sew…
—————————————————————
Every girl loves a pair of leggings (especially when you’re a skinny bean pole 4-year-old who looks great in them). Since my daughter is at preschool twice a week and has gymnastics class too, her wardrobe for fall and winter is made up of knit pants and leggings. It’s hard to pass them up when they’re $4/pair at Target! But I decided to make some of my own to give her wardrobe more variety. And, I decided to put a twist on it. Using elastic thread I ruched up the sides, added some buttons, and voila!…..
 This is a very easy 2 hour project. And once you’ve made one pair, you’ll want to make more. So let’s get started.
 This is a very easy 2 hour project. And once you’ve made one pair, you’ll want to make more. So let’s get started.
You need a man’s T-shirt or about 1/2 to 3/4 yard of knit fabric. For my pattern, I’m using a pair of leggings that my daughter already owns since I know they fit great.
If you don’t have a pair of leggings to use a your guideline:
* Buy a pair at the store, use them as you guide, and return them later if still in proper condition.
* Lil Blue Boo has a wonderful leggings pattern HERE that you can purchase for $6, sizes 6mos-8 years.
or
* Wing it! You may surprise yourself at what you can do if you go for it!
* Buy a pair at the store, use them as you guide, and return them later if still in proper condition.
* Lil Blue Boo has a wonderful leggings pattern HERE that you can purchase for $6, sizes 6mos-8 years.
or
* Wing it! You may surprise yourself at what you can do if you go for it!
It may not seem like it, but the back and front of most kids pants are slightly different. The back crotch is usually a longer to accommodate a booty. So I started by turning my pair of leggings inside out and traced one side of the pants (the front).
The beauty of using a T-shirt for leggings is that you can use the hem of the shirt as the hem of your pants! Woohoo! The project just got a little easier. So, make sure you line the pattern leggings up with the hem of the shirt like this:
 Trace around the leggings and cut it out, or don’t even both with the tracing….just start snipping! Since the pants are inside out, the seam allowance is already there, so you can cut right next to the pants. Remember that you’re cutting two Front pants pieces and TWO back pants pieces. So cut through both layers of the T-shirt.
 When you get to the top, you need to stretch it open, pulling the elastic waistband taut. It’s not the easiest thing to do (nor is taking a picture of it) but stretch it open and cut. MAKE SURE YOU CUT AN EXTRA INCH OF FABRIC AT THE TOP so you can fold the fabric over and create a new waistband casing down the road….
 Like this:
 Then flip the pants over to the other side and cut the BACK pants pieces (cut through both layers of the T-shirt so you have two pieces):
 Here’s what the Front and Back pieces should look like (on the left is the BACK, on the right is the FRONT):
 Okay, we’re going to make this as easy as possible here. Take the two FRONT pieces, and place them with right sides together (if you’ve just cut them out, then they’re wrong sides together, so flip them around). Sew down the crotch only. Do the same for the two BACK pieces.

 When sewing with knits, a zigzag stitch allows more stretch in your seam. But a standard stitch works as well (which is what I typically use). Don’t pull or tug the fabric as you go, just allow the machine to feed the fabric naturally.
I finish all my seams off with a serger but it’s not necessary with knits since they don’t fray. You can always use your serger to sew, without using your standard machine. However, your serger makes everything final and doesn’t allow for much error. This is why I often sew with my standard machine first, make sure everything is where I like it, make adjustments, and THEN serge off my seams.
 Trace around the leggings and cut it out, or don’t even both with the tracing….just start snipping! Since the pants are inside out, the seam allowance is already there, so you can cut right next to the pants. Remember that you’re cutting two Front pants pieces and TWO back pants pieces. So cut through both layers of the T-shirt.
 When you get to the top, you need to stretch it open, pulling the elastic waistband taut. It’s not the easiest thing to do (nor is taking a picture of it) but stretch it open and cut. MAKE SURE YOU CUT AN EXTRA INCH OF FABRIC AT THE TOP so you can fold the fabric over and create a new waistband casing down the road….
 Like this:
 Then flip the pants over to the other side and cut the BACK pants pieces (cut through both layers of the T-shirt so you have two pieces):
 Here’s what the Front and Back pieces should look like (on the left is the BACK, on the right is the FRONT):
 Okay, we’re going to make this as easy as possible here. Take the two FRONT pieces, and place them with right sides together (if you’ve just cut them out, then they’re wrong sides together, so flip them around). Sew down the crotch only. Do the same for the two BACK pieces.
 When sewing with knits, a zigzag stitch allows more stretch in your seam. But a standard stitch works as well (which is what I typically use). Don’t pull or tug the fabric as you go, just allow the machine to feed the fabric naturally.
I finish all my seams off with a serger but it’s not necessary with knits since they don’t fray. You can always use your serger to sew, without using your standard machine. However, your serger makes everything final and doesn’t allow for much error. This is why I often sew with my standard machine first, make sure everything is where I like it, make adjustments, and THEN serge off my seams.
The image below shows:
TOP – a zigzag stitched seam
BOTTOM – a zigzagged seam with a serged finish
TOP – a zigzag stitched seam
BOTTOM – a zigzagged seam with a serged finish
Both work fine.
 So, serge off your seams if you like or just leave them raw and let’s move on.
Leggings are already coming together!
 So, serge off your seams if you like or just leave them raw and let’s move on.
Leggings are already coming together!
Open up your Front and Back pieces and with right sides together, pin the leggings down both sides of each leg. I start by pinning at the bottom hem of each leg, so I make sure those are matched up perfectly.
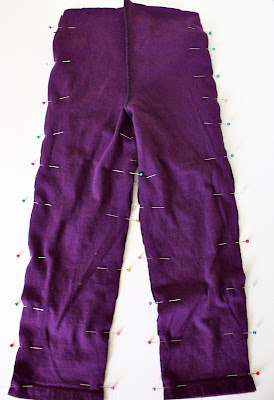 Then sew down the outside of each leg first:
 And finally, sew from the end of one inside leg, all the way up to the crotch and around down the other side of the leg, in one continuous line…..


 Serge off all your seams or leave them plain.
 Then sew down the outside of each leg first:
 And finally, sew from the end of one inside leg, all the way up to the crotch and around down the other side of the leg, in one continuous line…..

 Serge off all your seams or leave them plain.
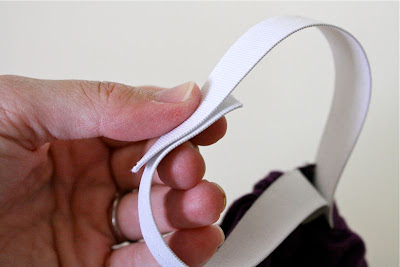
Next, create a casing for the waistband. I used 1/2 inch elastic here. You want it to be about as long as the waist itself or maybe a 1/2 inch shorter. Leggings should just be tight enough to keep them from falling off, but not gouging into a toddler’s pot-belly. You do need to add an extra inch however, so you can overlap the ends and sew the elastic closed.
 So, using the elastic as your guide, fold over the top of the leggings and measure how far down you’d like the casing to be and iron it all the way around:
 Pinning helps as well. Make sure you mark a start and stop point, so that you leave a small opening in the casing, for inserting elastic.
 Starting at the start point, sew all the way around to the stop point:
 Attach a safety pin to the end of your elastic and insert it into the small opening you left in the casing:
 Pull it all the way through and make sure the elastic isn’t twisted anywhere. Overlap the ends a 1/2 inch and sew it together.
 Then sew your casing closed:
 Add a fun label if you have one:
 And you’re done with a simple pair of leggings!

 The new pair looks very similar to the old one. Our pattern-making tricks worked. Ding!
 But let’s not stop there….let’s ruche up those legs for added flair!
 Thread you bobbin with elastic thread. It’s sold at most fabric shops and online for about $1.50. Normal thread goes in the top of your machine.
 Don’t wind it too tight, don’t wind it too loose, just somewhere in between. Load it into your machine and you’re ready to go!
 We’re going to be sewing two lines of elastic thread on the seams of each leg. Mark where the elastic thread will end on each leg, since once you get sewing, it’s hard to tell how far you’ve gathered. You can remove the pin as you get close to it. It’s just to help you eyeball the distance.
 So, using the elastic as your guide, fold over the top of the leggings and measure how far down you’d like the casing to be and iron it all the way around:
 Pinning helps as well. Make sure you mark a start and stop point, so that you leave a small opening in the casing, for inserting elastic.
 Starting at the start point, sew all the way around to the stop point:
 Attach a safety pin to the end of your elastic and insert it into the small opening you left in the casing:
 Pull it all the way through and make sure the elastic isn’t twisted anywhere. Overlap the ends a 1/2 inch and sew it together.
 Then sew your casing closed:
 Add a fun label if you have one:
 And you’re done with a simple pair of leggings!
 The new pair looks very similar to the old one. Our pattern-making tricks worked. Ding!
 But let’s not stop there….let’s ruche up those legs for added flair!
 Thread you bobbin with elastic thread. It’s sold at most fabric shops and online for about $1.50. Normal thread goes in the top of your machine.
 Don’t wind it too tight, don’t wind it too loose, just somewhere in between. Load it into your machine and you’re ready to go!
 We’re going to be sewing two lines of elastic thread on the seams of each leg. Mark where the elastic thread will end on each leg, since once you get sewing, it’s hard to tell how far you’ve gathered. You can remove the pin as you get close to it. It’s just to help you eyeball the distance.
This image shows 3 1/2 inches, but I’ve decided that 5 inches works best.
 It’s a little awkward to sew on the side of the leg since it’s so small and narrow. But just do your best. Make sure you’re not sewing on the other side of the leggings as you go!
 It’s a little awkward to sew on the side of the leg since it’s so small and narrow. But just do your best. Make sure you’re not sewing on the other side of the leggings as you go!
Start at the bottom of one leg, do a forward and back stitch, and sew up the side of the leg, about 5 inches and do a forward and back stitch at the end too.
 Hooray! Just one line of elastic thread and it’s already gathering up!
 Then sew another line, parallel to the first line.
 Hooray! Just one line of elastic thread and it’s already gathering up!
 Then sew another line, parallel to the first line.
And continue this step with the other 3 sides of the pant legs, sewing two parallel lines of elastic thread up the seam, about 5 inches.
When you’re done, spray the scrunched legs with water and then press them with an iron.This is key to getting your legs to scrunch up even more!

 When you’re done, they should look like this:
 You could stop there but the buttons really add the special touch. Use 3-4 small buttons for the outside of each leg. This gives them sort of a “riding pants” look.
 Using a needle and thread, start by sewing the top button on where the elastic thread ends. This is the perfect time to sit down and watch Project Runway…..

 Then sew the bottom button onto the pants next. This will help you space all 4 buttons more easily.
 Then sew on the other two buttons, somewhere in between:
 And you’re officially done!!!
 One cute pair of Ruched Leggings ready for school….or a party, or hanging at the park, or going to the mall, or dancing around for hours. Leggings are the IT fashion for fall.

 When you’re done, they should look like this:
 You could stop there but the buttons really add the special touch. Use 3-4 small buttons for the outside of each leg. This gives them sort of a “riding pants” look.
 Using a needle and thread, start by sewing the top button on where the elastic thread ends. This is the perfect time to sit down and watch Project Runway…..
 Then sew the bottom button onto the pants next. This will help you space all 4 buttons more easily.
 Then sew on the other two buttons, somewhere in between:
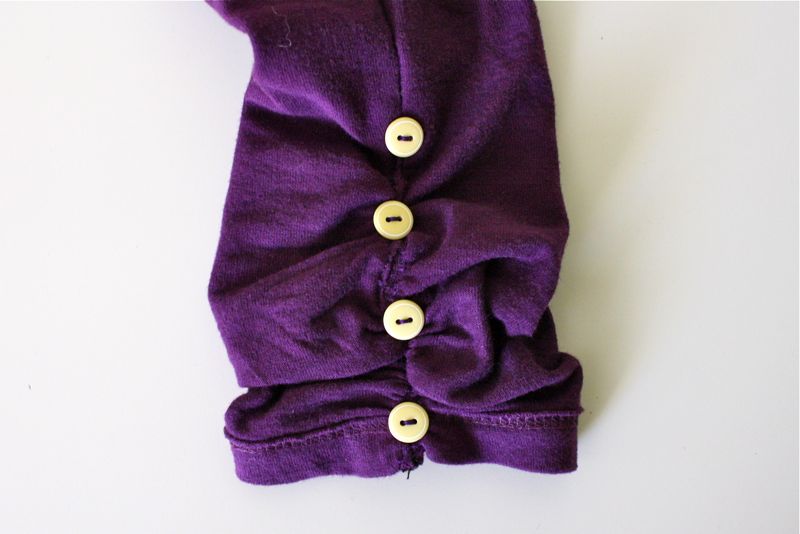 And you’re officially done!!!
 One cute pair of Ruched Leggings ready for school….or a party, or hanging at the park, or going to the mall, or dancing around for hours. Leggings are the IT fashion for fall.
Enjoy!


Iscriviti a:
Post (Atom)